 |
 |
Pictures & Patterns © 2001-2020 Patti Pierce Stone, All Rights Reserved
terms of use...
These patterns pattern for charity or personal use only -- neither it, nor items made from it, are to be sold.
Nor should they be as a teaching material unless the teacher’s time is donated!
You may provide a direct link to a pattern, but may not copy the contents to your web site or any other form of communication.
Photocopies may be made and shared as long as the copyright notice and terms of use are visible.
If you choose to make items from these patterns for yourself or family, please also consider making a item for charity!
Not sure where to donate them ... click here for some ideas www.p2designs.com/CharityList.html
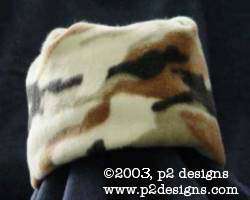
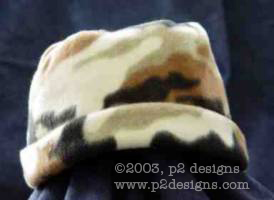
Quick & Easy Polar Fleece Ski Cap
needed:
- 1 yd polar fleece
- this will make approx 4 hats (depending on fabric width)
- serger or sewing machine
helpful:
- rotary cutter and mat (makes for quick cutting)
I used regular weight woolly nylon throughout my serger (needle too) so that the stitching stretches with the fleece. However, I'm sure you can use regular poly serger thread, or zigzag on a sewing machine. The finished hat should be btwn 10" and 11" tall from bottom edge to the top seam.
See the notes below for making without a cuff ... perfect for the ground troops that are served by The Ships Project.
- With the greatest stretch of the fabric going the width (the circumference of the head), cut a rectangle that is 23" wide (this is based on my husband) and 15" tall
- fold the rectangle, right sides together, on the width (now 11 1/2 x 15) and serge or sew the long seam -- you should have a tube that is 15" tall
- flatten the tube with the seam in the middle and seam across one short end to close the tube on one side.
- this is the part that's hard to describe ... still inside-out and with the seam in the middle of the side facing you when you lay it flat on a surface, form 2 inward pleats (for lack of a better term) in the top. Poke an index finger into each "corner" and fold them over so they meet in the middle, but on the inside of the tube, squaring the top.
- pin in place with a couple of straight pins
- serge/sew across the points of the pleats from the inside. alternatively, you can sew across the overlapped pointed and through the top of the hat at the same time.
- you should be able to turn this inside out now and have a hat shape.
- with the hat right-side-out, measure 10"/11" from the top seam and fold the remainder inside. serge/sew a blind hem.
- fold the large hem back to the outside for a cuff. You can use embroidery thread and blanket stitch or cross stitch it down. If you don't want visible stitching, just take a couple of thread tacks (5 or 6) around the cuff to hold it in place.
Alternatively for the cuff, you can cut the hat to 12" and sew on a contrasting colored cuff (doubled and seam to the outside -- it will be on the inside once you fold it up)
If you don't want a cuff at all (the ground troops for The Ships Project can't have cuffs), cut the hat to 10" and turn up a 1" hem. If making the hat for the ground troops, please be sure to use a camo or black fleece.
©2001-2030 p2 designs, all rights reserved
no part of this website, including but not limited to graphics, photos, or text
is to be used for any reason without the written permission of the owner